With the explosive growth of Kubernetes over recent years, software engineering teams are facing new challenges: increasing complexity, manual and time-consuming deployments, and inconsistent development environments.
Software teams should be focused on building and optimizing applications, not managing the intricacies of Kubernetes deployments.
Top 15 Kubernetes resources
In the context of containerized applications and your Kubernetes environment, software teams have to work with Dockerfiles and Kubernetes YAML configuration files, typically referred to as manifest files, that describe how application deployment should be carried to a cluster. A full-fledged CI/CD system would be excessive, so software developers need a tool that can support the inner-loop development workflow of cloud-native applications on their local machines.
This is where Skaffold comes in. Skaffold offers an automated approach to building container images from source code and deploying them to a Kubernetes cluster in a development environment.
In this article, you will learn about Skaffold, scenarios in which it really shines, and how to implement it for your Kubernetes development workflow.
What is Skaffold?
Skaffold is a command line tool that provides continuous development for applications released to either local or remote Kubernetes clusters.
Skaffold aims to simplify the cloud-native development journey for software developers, and is particularly helpful for software teams that would benefit from:
- application debugging
- a toolkit to create continuous integration/continuous delivery pipelines
- an automated approach to building Docker images and Kubernetes YAML manifest image tagging
- quick reflections of source code changes in their Kubernetes clusters
Skaffold is an open source project from Google that has been generally available since November 7, 2019, and is released under the Apache 2.0 license.
Top benefits of using Skaffold
Cloud-native application development can be arduous and time-consuming. Consider the steps it requires:
- Software developer writes code for new features or bug fixes
- A container image with the latest changes needs to be built, tagged, and pushed to an image repository
- To reflect image tag changes, manifest files (typically a Deployment or Pod manifest file) need to be modified
- Application needs to be deployed, either to a local Kubernetes cluster or to a remote Kubernetes cluster on a hosted provider like Google Kubernetes Engine (GKE), Amazon’s Elastic Kubernetes Service (EKS), Azure Kubernetes Service (AKS)
Doing this manually, over and over again, can quickly become an impediment to workflow efficiency and quality, not to mention the developer experience.
Below are some of the scenarios in which Skaffold proves especially useful.
- Efficient Development Workflow: Instead of relying on a tedious manual process for deploying to a Kubernetes cluster, Skaffold automates and abstracts the build and deployment steps of container images for you. This makes the inner loop more efficient, with quick changes and fixes visible in Pods running in the local cluster or remote cluster. Skaffold still works with your favorite tools like helm charts too.
- Creating CI/CD Pipelines: By using Skaffold’s cli tool (i.e. skaffold dev, skaffold build, or skaffold deploy), you can create a continuous integration pipeline for a local development workflow for your local kubernetes clusters, or create production-grade CI/CD pipelines integrated with other tools such as GitHub Actions or ArgoCD.
- Minimal Kubernetes Knowledge and Experience: Skaffold is designed to take the responsibility of Kubernetes configuration management out of the hands of software development teams. The goal is to enable developers to focus on application development, not on acquisition of in-depth knowledge of Kubernetes.
- Improve Developer Experience: Software developers aren’t opposed to Kubernetes environments, but they want a simplified approach with declarative configuration that abstracts away some of the complexities of Kubernetes. A tool like Skaffold is suitable for enhancing the entire developer experience, from changes to application source code on a local machine to results in the cluster.
- Integration with Google Cloud: Being an open source project from Google, Google has additional tooling to streamline application deployment to services like Google Cloud Build or Google Kubernetes Engine (GKE) through Cloud Code, an extension for popular IDEs like Visual Studio Code (VS Code) and IntelliJ. Cloud Code manages your Skaffold installation and automatic updates. By baking Skaffold into your editor like Visual Studio Code, Cloud Code speeds up the inner development loop for remote clusters on Google like GKE and Cloud Run.
How to implement Skaffold
In this section, you’ll install Skaffold and create a simple project to get a taste of the inner development workflow with Skaffold.
Prerequisites
- Rancher Desktop
- Skaffold
- Docker Hub Account (or another container registry, like Amazon ECR, GitLab Container Registry, or Google Container Registry)
Local Kubernetes environments
Provision Kubernetes cluster
In this section, you will use Rancher Desktop to provision a Kubernetes cluster. Rancher Desktop gives you a fully fledged Kubernetes cluster, but is very lightweight and easy to get running. It gives you a single-node cluster out of the box, and updates the context of your kubeconfig to connect to the Rancher Desktop cluster. Once Rancher Desktop is ready, you can check that you can connect to your cluster with one of the following commands:
kubectl cluster-info
kubectl config current-context
Install Skaffold
After provisioning your cluster, the next step is to install Skaffold. Below are options to install Skaffold through the command line on the major operating systems or on Docker. For more details on installation, you can view the official Skaffold documentation.
Linux
For Linux x86_64 (amd64)
curl -Lo skaffold https://storage.googleapis.com/skaffold/releases/latest/skaffold-linux-amd64 && sudo install skaffold /usr/local/bin/
For Linux ARMv8 (arm64)
curl -Lo skaffold https://storage.googleapis.com/skaffold/releases/latest/skaffold-linux-arm64 && sudo install skaffold /usr/local/bin/
MacOS
For macOS on x86_64 (amd64)
curl -Lo skaffold https://storage.googleapis.com/skaffold/releases/latest/skaffold-darwin-amd64 && sudo install skaffold /usr/local/bin/
For macOS on ARMv8 (arm64)
curl -Lo skaffold https://storage.googleapis.com/skaffold/releases/latest/skaffold-darwin-arm64 && sudo install skaffold /usr/local/bin/
Windows
# Using Scoop
scoop bucket add extras
scoop install skaffold
# Using chocolatey
choco install -y skaffold
Docker
docker run gcr.io/k8s-skaffold/skaffold:latest skaffold
After selecting one of the above options, verify that Skaffold has been installed by running the following command:
skaffold version
Getting started with Skaffold
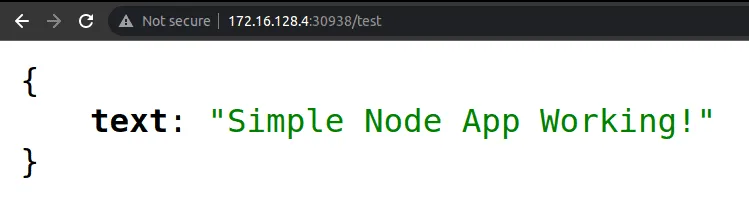
This section will cover the usage of Skaffold with a custom Node.js application. This application has a single endpoint (/test) that returns the text “Simple Node App Working!”.
// Express App Setup
const express = require('express');
const http = require('http');
const bodyParser = require('body-parser');
const cors = require('cors');
// Initialization
const app = express();
app.use(cors());
app.use(bodyParser.json());
// Express route handlers
app.get('/', (req, res) => {
 res.status(200).send({ text: 'Welcome To This Basic Node.js Application!' });
});
app.get('/test', (req, res) => {
 res.status(200).send({ text: 'Simple Node App Working!' });
});
module.exports = app;
Initialize Kubernetes manifest files
The following manifest files will be applied to the cluster by Skaffold. This deployment.yaml file is a declarative configuration that will be applied continuously, based on the incremental changes made to the source code.
apiVersion: apps/v1
kind: Deployment
metadata:
name: express-test
spec:
replicas: 1
selector:
  matchLabels:
    app: express-test
template:
  metadata:
    labels:
      app: express-test
  spec:
    containers:
    - name: express-test
      image: /express-test
      resources:
         limits:
           memory: 128Mi
           cpu: 500m
      ports:
      - containerPort: 8080
Here is a service to ensure the application can be invoked from your browser:
apiVersion: v1
kind: Service
metadata:
 name: express-test-svc
spec:
 selector:
   app: express-test
 type: LoadBalancer
 ports:
 - protocol: TCP
   port: 8080
   targetPort: 8080
Initialize Dockerfile
Create the initial Dockerfile that Skaffold will use to build container images from source code changes.
FROM node:14-alpine WORKDIR /usr/src/app COPY [“package.json”, “package-lock.json*”, “npm-shrinkwrap.json*”, ”./”] RUN npm install COPY . . EXPOSE 8080 RUN chown -R node /usr/src/app USER node CMD [“npm”, “start”]
Initialize Skaffold
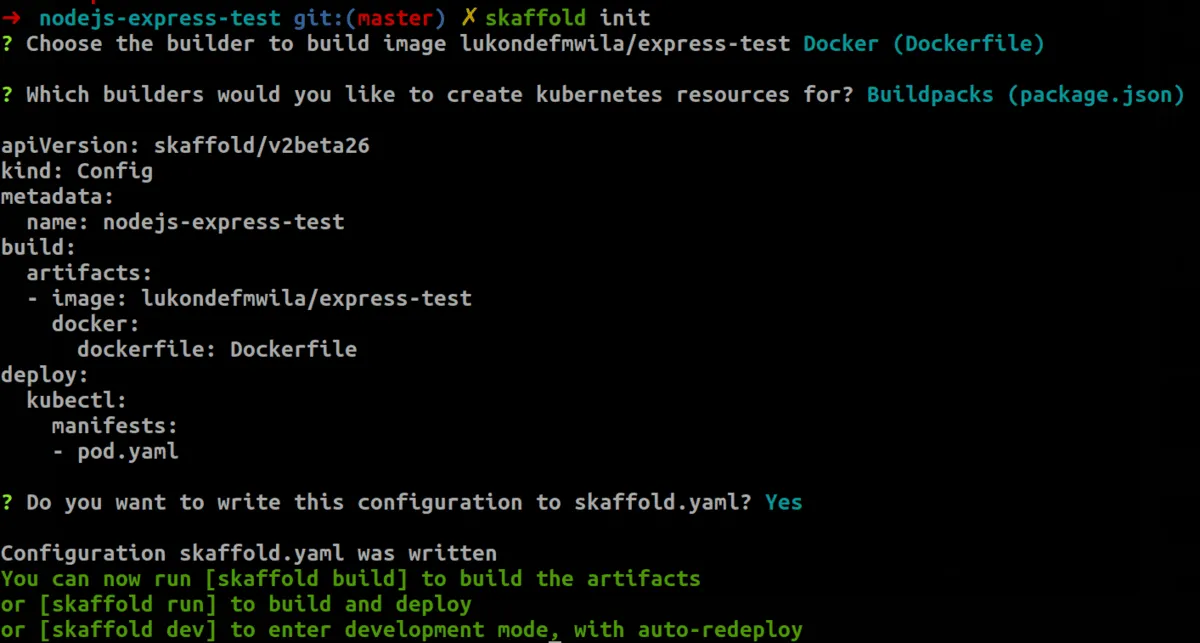
You can initialize your project by running skaffold init, after which you’ll be prompted with a series of questions that will shape the output of your Skaffold configuration file. The skaffold.yaml configuration file describes the build and deployment aspects of the workflow. This file is automatically generated with the skaffold init command.
apiVersion: skaffold/v2beta26 kind: Config metadata: name: nodejs-express-test build: artifacts:
- image: /express-test
docker:
dockerfile: Dockerfile
deploy:
kubectl:
manifests:
- deployment.yaml
- service.yaml
Execute continuous development workflow
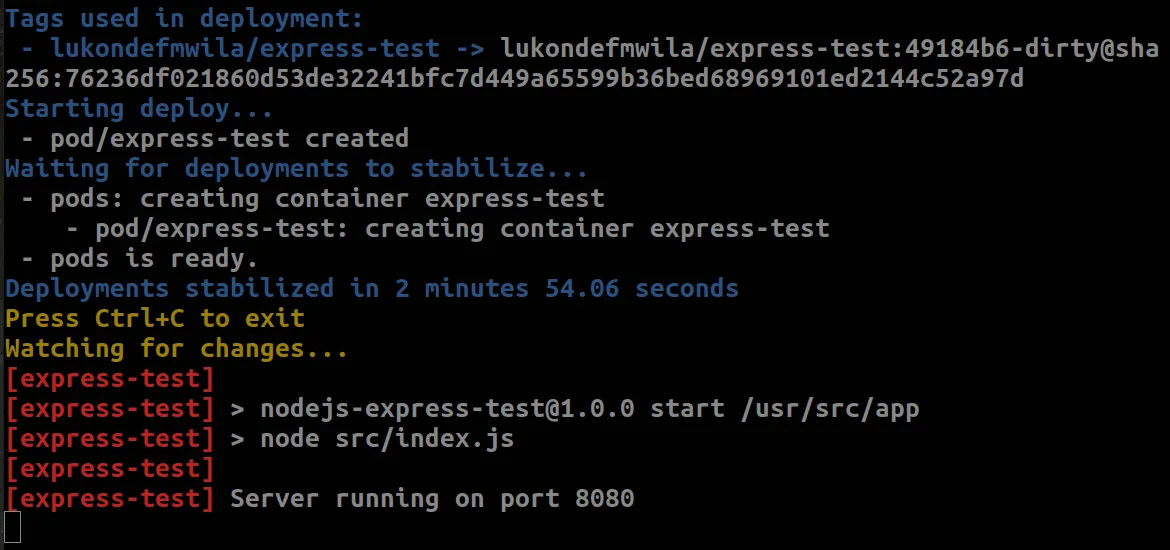
Once your project has been initialized, you can proceed to run the continuous development workflow. In this mode, Skaffold will continuously watch the source code files for any changes. When a change is detected, Skaffold will rebuild the image and push it to a local or remote container registry, depending on your Kubernetes cluster configuration. After that, Skaffold will re-deploy the application.
To create this workflow, run skaffold dev.
After successful deployment, you can verify that the relevant Kubernetes resources have been created.
kubectl get pods
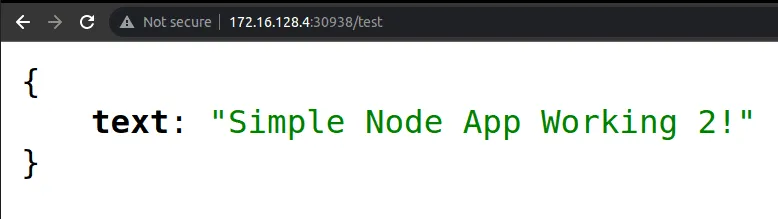
kubectl get servicesYou can view your application by going to localhost in the browser and entering the port on which the application is listening for traffic, which in this case is 8080. The entire URL is http://localhost:8080/test. If you’re using a LoadBalancer service as specified above, Rancher Desktop will take care of forwarding traffic to the service, which will in turn forward traffic to the application running in the pod replicas. If you’re using a NodePort service type, the application’s URL needs to include the assigned NodePort for the created service. This can be retrieved by running kubectl describe service express-test-svc.
After that, modify the source code for the application in the src/app.js file from Simple Node App Working! to Simple Node App Working 2!. This change will trigger a rebuild, and Skaffold will deploy the updated image to your cluster.
Conclusion
As Kubernetes applications become more prevalent in the software development landscape, software teams and businesses should encourage and enable their developers to make use of Kubernetes in a way that doesn’t complicate their inner development loop. Software developers’ primary concern should be using efficient workflows to deliver high-quality software, and the complexities of Kubernetes shouldn’t get in their way. Skaffold is a tool that automates and abstracts the workflow for software developers, allowing for cloud-native development with Kubernetes without compromising on developer experience, efficiency, or best practices.