
On Nov 13, 2019 Github made it’s CI/CD solution GitHub Actions generally available to the world. Since then tens of thousands of shared workflows have been published. It is now the default for most Github projects given how easy it is to integrate with an existing repo. Projects of all sizes have adopted it from our homegrown Terraform module to the Docker Cli. This is why at Speedscale we’ve published a template for how to use Speedscale in conjunction with GitHub Actions.
Why is CI/CD so important?
A 4 letter solution has a 4 letter problem; we need CI/CD because of WOMM. Works On My Machine is a phrase every developer has both used and unwillingly heard. Development environments are highly customized and setup in bespoke ways. Source control such as git helps ensure that the state of the code is exactly the same for all developers. Then when combined with a pristine builder environment that continuously builds, tests and deploys code this ensures we have consistent and predictable codebases.
Why GitHub Actions?
Quite simply, it’s right there! Part of the pain of CI systems is configuring them. Finding the right networking and permissions to be able to clone your repo, publish artifacts and releases back to it, use the right web hook triggers, etc is a pain. With Actions, this is all built in and the results are also available in the built in Github UI. On top of this, the marketplace contains a wide variety of pre-built actions that are shared amongst the community, with more being added everyday. There are formulas for everything from building NodeJS and React Projects to publishing Helm charts and deploying to Kubernetes.
So what does Speedscale have to do with this?
Our workflow template provides a way for you to build your code, deploy it to Kubernetes and then run a traffic replay against it with whatever testing parameters you’d like. This means you could run a load test, a chaos test, a simple regression test, a backwards compatibility test or any combination of these all available through our editable test configs.
How to use the template
There are two high level jobs specified in the workflow, build and test.
Build
- The build job in the example does a checkout, you definitely want to keep this step.
- Add any test steps you want to run in your pipeline such as
go test - The next section does a Docker build and push. For eg. here you would replace
[gcr.io/myimage:latest](http://gcr.io/myimage:latest)with your image name and tag.
.
Test
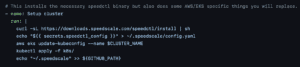
- Setup
kubectlandspeedctl. You should populate the secretspeedctl_configwhich should be the file generated during your CLI setup as documented here and is installed by default to~/.speedscale/config. Yourkubectlsetup will vary based on what cloud provider you use and how you configure authentication. For eg. if you use GKE, you’ll replace theaws eks ...line withecho $KUBE_CONFIG >> ~/.kubectl/config
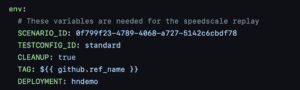
- Set these variables
- SCENARIO_ID: This variable determines which subset of traffic will be sent against your service.
- TESTCONFIG_ID: The test config will control things like how fast load should be generated, how many concurrent requests will be played, what success rate is passing and so on.
- CLEANUP: You may want to keep your deployment around after running a Speedscale replay just in case you want to debug it later. Set this flag to true or false accordingly.
- TAG: This is a tag you’ll probably want to use for your docker image push as well as the report generated by Speedscale so you can keep track of which report matches with which one of your CI runs.
- DEPLOYMENT: This is just the name of your deployment which we need so we can patch it and add the annotations.
These environment variables are identical to the parameters found in the How To instructions found for your existing snapshot in the dashboard.
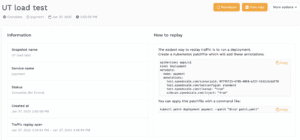
- To customize your replay even more, you can add more parameters to the
patch.ymlgenerated in the test step as specified here.
Get started with your own Github actions and Traffic Replay tests today.