The Ultimate Guide to a Smooth Dev Environment
Setting up a development environment can be challenging, especially for new developers or those adapting to new developer tools. One common hurdle is setup time, as configuring all the necessary components can delay the start of actual work. A local development environment offers significant advantages for testing and debugging, allowing developers to work efficiently on their own machines without relying on remote resources. A well-configured environment is crucial for efficient coding, testing, and debugging, enhancing productivity and minimizing errors. When setting up your tools, remember that an integrated development environment (IDE) is a type of software application designed to streamline development by integrating coding, debugging, and automation features. This guide will walk you through everything you need to know, from the basics to advanced customizations for different operating systems. Whether you’re starting out or refining your setup, you’ll find practical tips to optimize your workspace, streamline your workflow, and ensure your environment is secure and efficient.
Understanding the Basics of a Development Environment
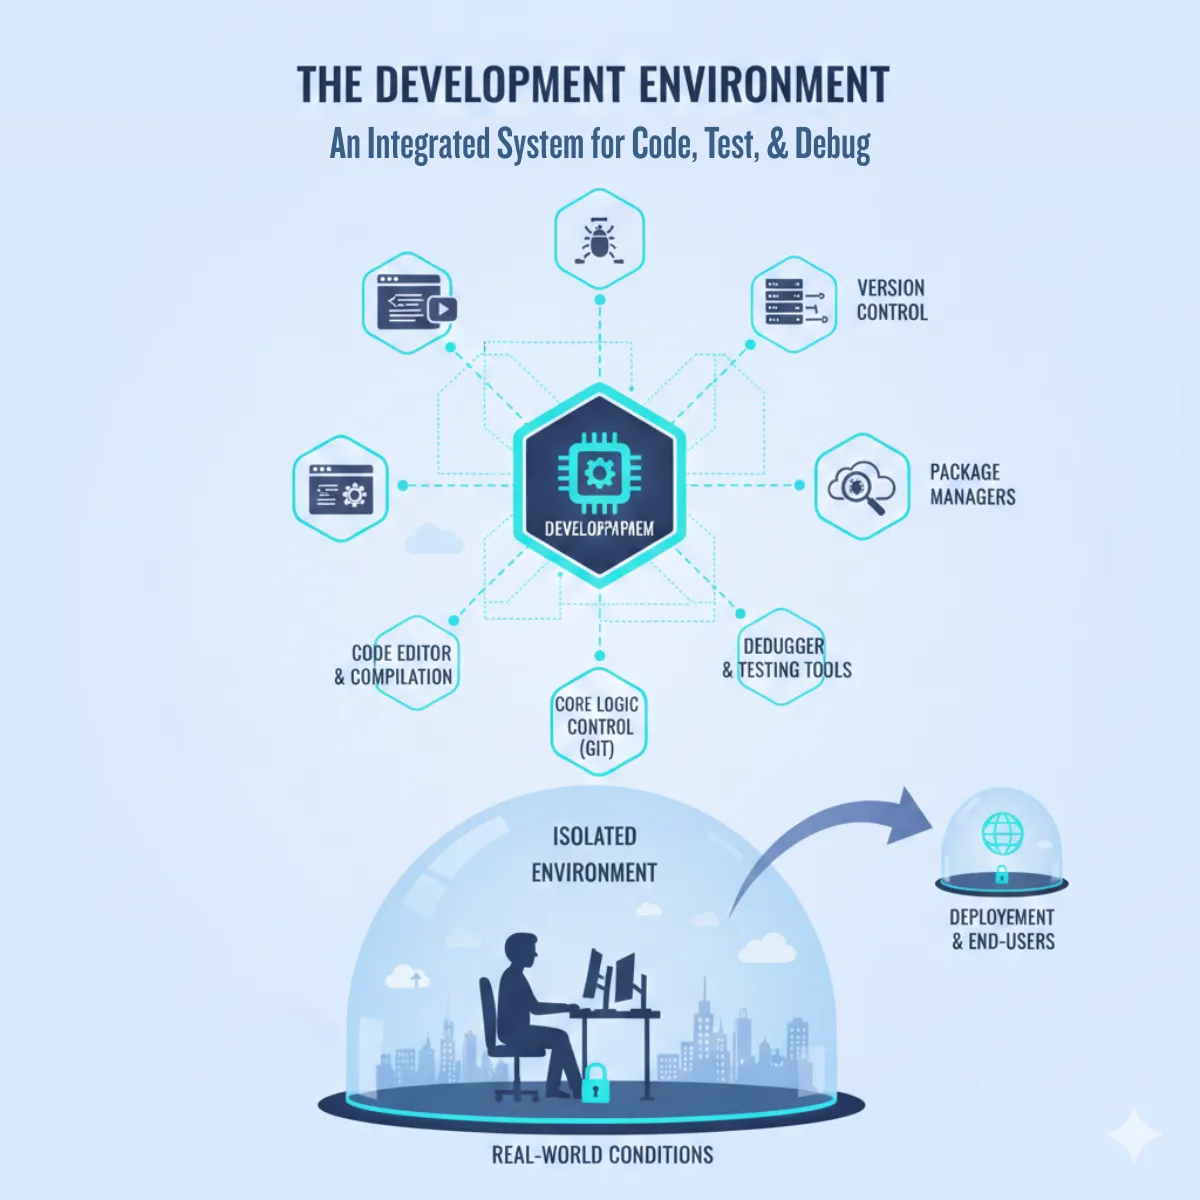
A development environment is a carefully configured setup of hardware, software, and tools essential for writing, testing, and debugging code. It provides a controlled space that mimics real-world conditions, allowing software developers to identify and fix issues early, reducing errors and saving time. This isolated environment ensures that code can be safely created, tested, and refined without impacting live systems, making the development process more efficient. Simulating different scenarios and configurations allows for optimizing applications for performance and stability before reaching end-users. Whether developing web, mobile apps, or other software, a well-structured development environment is crucial for experimentation, iteration, and perfecting code, making it an invaluable tool for developers at any level. Within the broader field of software engineering, development environments play a key role, but measuring productivity in software engineering remains challenging due to the complexity of workflows and the limitations of traditional metrics.
Setting Up a Development Environment
Setting up your development environment is crucial for efficient coding, testing, and debugging. Here’s a streamlined guide to the essential components.
Install a Code Editor
Choose a code editor like Visual Studio Code or Sublime Text—or an Integrated Development Environment (IDE) like IntellliJ. Modern IDEs offer advanced features such as intelligent code completion, real-time feedback, and seamless integration of development tools, which significantly improve programmer productivity. Look for features such as syntax highlighting, plugins, support for multiple languages, and an integrated terminal to enhance productivity and streamline your workflow. Many modern IDEs also support languages like Visual Basic, especially for visual programming and drag-and-drop application development. Note that Visual Studio Code can in a way be set up to be a fully-fledged IDE, by way of extensions.
Version Control Systems
Install Git for version control to manage changes in your codebase, collaborate with others, and track different project versions. A source repository is used to store and manage different versions of your code externally, enabling seamless collaboration and version tracking. The basic setup includes configuring your username, email, and SSH keys.
Terminal and Shell Options
Execute commands using terminals like Windows Terminal, iTerm2, or built-in options on macOS and Linux. Customizing themes, fonts, and shortcuts can optimize your workflow.
Package Managers
Package managers like Chocolatey (Windows), APT (Linux), and Homebrew simplify software installation and management. They keep your tools up-to-date and reduce dependency conflicts.
Environment Variables
Set up environment variables like PATH to ensure your system can access tools and runtimes. Proper management helps avoid configuration issues and smoothens the development process.
Installing Language Runtimes and Tools
Install runtimes for your programming languages (e.g., Python, Node.js) using package managers. Use version managers (e.g., pyenv, nvm) to handle multiple language versions across projects.
Configuring Your Environment
Enhance your setup with linters, formatters, and debuggers to improve code quality and efficiency. Customize editor settings to personalize your development experience and maintain consistent code standards.
Testing Your Setup
Run basic tests, like a “Hello World” script, to verify that your environment is correctly configured. These checks ensure that your tools, runtimes, and editors are properly integrated before starting more complex projects. This streamlined setup will help create a productive and efficient development environment tailored to your needs.

Windows-Specific Setup
Setting up a development environment on Windows requires specific configurations to optimize your workflow. Below are the key steps to tailor your environment for Windows, focusing on terminal setup, package managers, and environment variables.
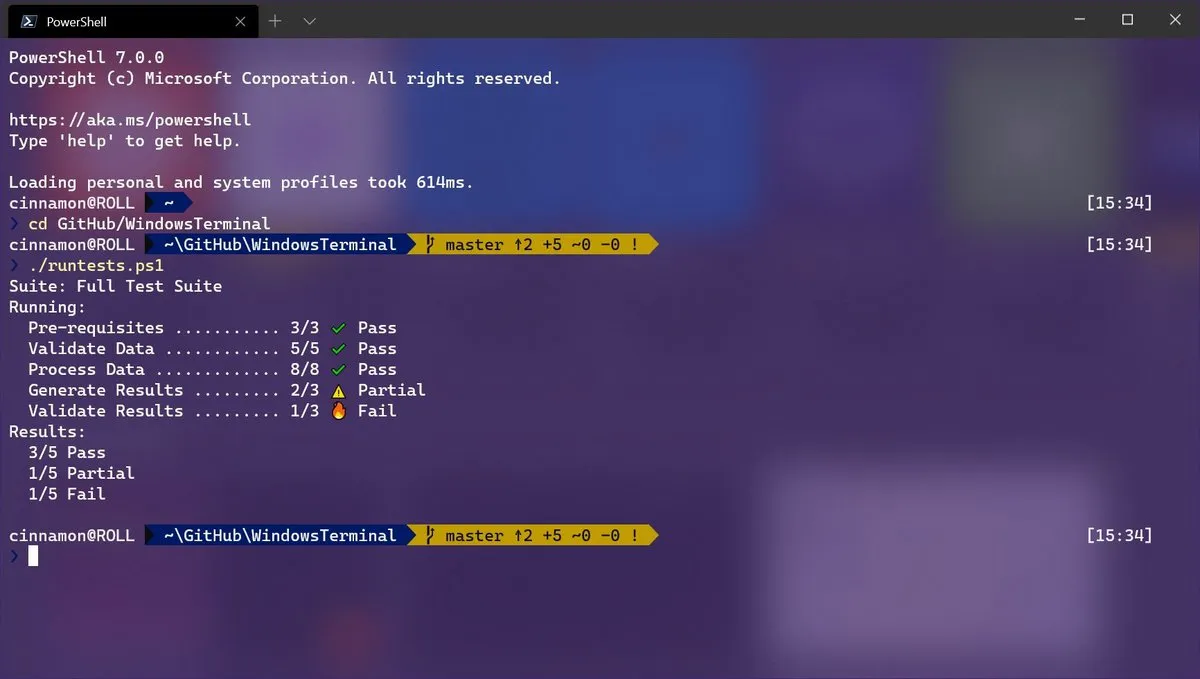
Install Windows Terminal
Windows Terminal is a modern, versatile terminal application that supports multiple shells, including Command Prompt, PowerShell, and Git Bash. Unlike the traditional Command Prompt, Windows Terminal offers a more feature-rich experience with support for multiple tabs throughout, customizable themes, and various shell options, making it a preferred choice for developers.
- Command Prompt and PowerShell: Command Prompt is the classic shell for executing commands on Windows, while PowerShell offers more advanced scripting capabilities and greater integration with Windows management tasks.
- Git Bash: Git Bash provides a Unix-like shell experience on Windows, which can be particularly useful if you are accustomed to Linux command line tools.
Customizing Windows Terminal
To enhance your productivity, you can customize Windows Terminal settings by accessing the settings file (settings.json). Here, you can change the appearance of the terminal, set custom key bindings, and tweak the startup behavior of windows command prompt and different shells. You can adjust font styles, background images, and color schemes to create an environment that is both visually appealing and tailored to your workflow.
Using Windows Package Managers
Windows package managers like Chocolatey and Scoop simplify the installation and management of software on your machine. These tools help automate software setup, allowing you to install, update, and manage applications via the command line.
-
Chocolatey: A widely-used package manager for Windows that enables you to install software with a single command. For example, to install Node.js, you would use:
choco install nodejs -
Scoop: Another package manager that emphasizes simplicity and avoids requiring administrative permissions for installations. To install Python using Scoop, you would use:
scoop install python
These package managers are particularly useful for maintaining consistency in your development environment, as they allow you to quickly set up or replicate environments across different systems.
Windows Environment Variables
Environment variables are crucial for configuring how your operating system and applications behave. On Windows, managing environment variables involves navigating through the system settings, which can be slightly different from other operating systems.
- Modifying Environment Variables: To add or edit environment variables, you can access the settings through the following steps:
- Open the Start menu and search for “Environment Variables.”
- Click on “Edit the system environment variables.”
- In the System Properties window, click the “Environment Variables…” button.
- Navigating Environment Variables: In the Environment Variables window, you can create new variables, modify existing ones, or delete unnecessary entries. For instance, to add a new path to the PATH variable, select “Path” under “System variables,” click “Edit,” and then add the desired directory path.
- Practical Example: Adding Git to your PATH variable ensures you can use Git commands from any terminal window. This configuration is essential for a seamless development experience, enabling all your tools to work together harmoniously.
By carefully configuring your terminal, utilizing package managers, and properly setting environment variables, you can create a streamlined and efficient development environment on Windows. These steps not only enhance your coding workflow but also make managing your tools and software much easier.
Linux-Specific Setup
Setting up a development environment on Linux provides flexibility and control, making it an ideal choice for many developers.
Choosing and Configuring a Shell
Linux offers various shell options, each with unique features that can enhance your command-line experience. The default shell on most Linux distributions is Bash, but other popular alternatives include Zsh and Fish.
- Bash (Bourne Again Shell): The most common shell on Linux, Bash is powerful, highly scriptable, and familiar to most developers. It provides robust scripting capabilities and is suitable for general-purpose use.
- Zsh (Z Shell): Zsh builds on Bash’s functionality, offering enhanced features like auto-suggestions, improved tab completion, and support for custom themes and plugins through frameworks like Oh My Zsh.
- Fish (Friendly Interactive Shell): Known for its user-friendly syntax and intuitive command-line interface, Fish provides advanced features like syntax highlighting and smart suggestions out-of-the-box without requiring extensive configuration.
- Customizing Your Shell:
-
Oh My Zsh: A popular framework for managing Zsh configurations, Oh My Zsh allows you to easily add themes and plugins, enhancing both aesthetics and functionality. Installation is simple and can be done with a single command:
sh -c "$(curl -fsSL https://raw.githubusercontent.com/ohmyzsh/ohmyzsh/master/tools/install.sh)"Powerlevel10k: A highly customizable Zsh theme that displays useful information like Git status, Python virtual environments, and system load in a visually appealing way. To install Powerlevel10k, follow the instructions provided in the Oh My Zsh themes section.
-
These customizations can significantly improve your efficiency and make your command-line environment visually engaging and informative.
Using Linux Package Managers
Linux package managers are essential for installing and managing software, offering a simple way to keep your system up-to-date and organized.
-
APT (Advanced Package Tool): Used primarily on Debian-based distributions like Ubuntu, APT is the go-to package manager for installing software. For example, to install Git, you would run:
sudo apt update sudo apt install git -
Homebrew: Originally developed for macOS, Homebrew is now available on Linux and provides an easy way to install newer or alternative software versions. For instance, to install Node.js, use:
brew install node
-
Snap: A package manager that provides self-contained applications, Snap is particularly useful for installing the latest software versions across different Linux distributions. To install VS Code, you would use:
sudo snap install code --classic -
YUM (Yellowdog Updater, Modified): Used mainly on Red Hat-based distributions like CentOS and Fedora, YUM allows you to manage RPM packages. For example, to install Python, run:
sudo yum install python3
These package managers streamline the software installation process, ensuring your development environment is equipped with the necessary tools to develop full and up-to-date software.
Linux Environment Variables
Environment variables on Linux control how your system behaves and how applications access resources. Properly configuring these variables can enhance your development experience and prevent common setup issues. Environment variables can be added or modified directly in shell configuration files such as .bashrc, .zshrc, or .config/fish/[config.fish](http://config.fish/) for Fish. To add a directory to your PATH, you would append a line like this to your configuration file:
export PATH="$PATH:/your/new/path"After editing the file, apply the changes by running source ~/.bashrc (or the equivalent command for your shell).
Persisting Changes Across Sessions
The best practice for environment variable changes is to make them in the shell’s configuration file, ensuring they are loaded each time a new terminal session is started. For changes that should apply system-wide, you can add them to /etc/environment or similar global configuration files. Always back up configuration files before making significant changes to project files to avoid misconfigurations that could impact your system’s behavior. By carefully selecting and configuring your shell, efficiently managing software with package managers, and properly setting environment variables, you can create a highly functional and personalized development environment on Linux. These steps help you leverage the full power of Linux, making your coding experience smoother and more productive.
Development Process Optimization
Optimizing the development process is essential for boosting developer productivity and delivering high-quality software efficiently. By leveraging modern development tools and integrated development environments (IDEs) like Visual Studio Code, teams can streamline their workflows and minimize time spent on repetitive tasks. Features such as syntax highlighting, code completion, and built-in debugging empower developers to write, test, and refine code with greater accuracy and speed. Incorporating robust version control systems, such as Git, further enhances collaboration by making it easy to track code changes, manage branches, and coordinate work across teams. When the development process is optimized with the right tools and practices, teams can increase developer productivity, improve code quality, and accelerate the delivery of software applications—ultimately leading to better outcomes for both developers and end users.
Building and Debugging Applications
Local development tools are essential for enhancing efficiency and accelerating the coding process. They provide immediate feedback, enabling real-time debugging and testing in an environment that closely mirrors production. This setup allows developers to quickly identify and fix issues, ensuring a smoother development experience.
While pull requests are often used to track coding activity, they may not always accurately reflect meaningful contributions or true productivity, as they can sometimes encourage unnecessary busywork instead of impactful development.
- Compilers and Interpreters: These tools, such as the JVM for Java or the Python interpreter, are vital for running code locally, enabling you to test and debug applications directly on your machine.
- Debuggers: Tools like Chrome DevTools and GDB are critical for diagnosing and resolving issues. They allow you to step through code, inspect variables, and set breakpoints, making troubleshooting more manageable.
- Package Managers: Tools like npm and pip streamline the management of dependencies and environment setup, ensuring your project remains consistent and up-to-date.
By leveraging these local development tools, teams can streamline workflows, reduce errors, and improve developer productivity.
Modern Approaches to Local Development and Debugging
Docker is a popular tool that creates isolated, reproducible environments, simplifying the process of running applications locally. It ensures that your development setup is consistent across different machines and stages, reducing “it works on my machine” issues. Some best practices include:
- Automate builds using scripts to save time and minimize errors.
- Use breakpoints and logs for effective debugging and quicker identification of problems.
- Leverage incremental builds and local testing to catch issues early in the development cycle.
By integrating these tools and practices, you can optimize your development workflow, making the process of building and debugging applications more efficient and reliable.
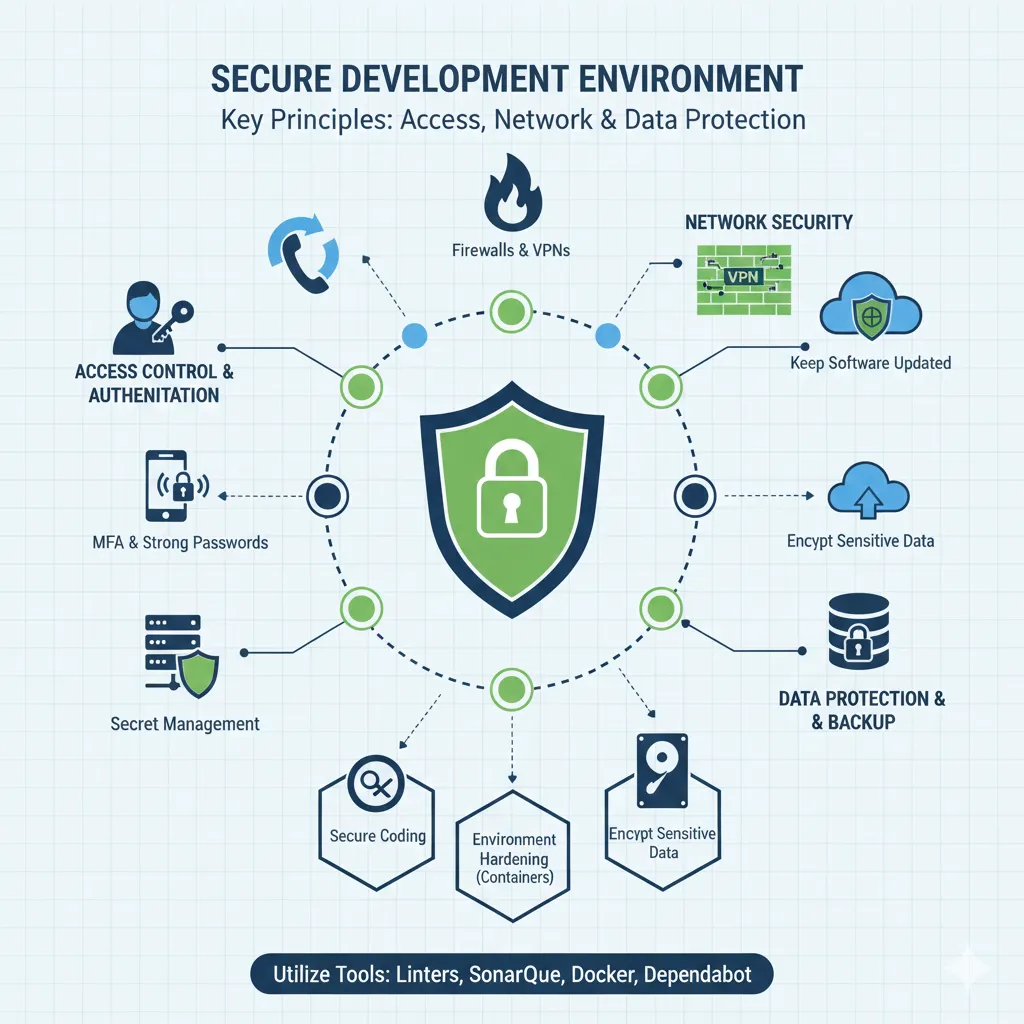
Development Environment Security
Securing your development environment is crucial to protect your code, data, and infrastructure. Implementing key security principles ensures that your environment is safe from unauthorized access and vulnerabilities.
Key Principles of a Secure Development Environment
Implementing robust security measures is essential to protect your development environment from vulnerabilities. This involves a combination of access control, network security, and data protection strategies that help safeguard your code and infrastructure.
- Access Control and Authentication: Use strong, unique passwords and multi-factor authentication (MFA) for all tools and services. Restrict access based on the principle of least privilege and use SSH keys for secure server access instead of passwords.
- Network Security: Secure your connections with firewalls and VPNs, and avoid using public Wi-Fi. Keep all software, libraries, and dependencies up-to-date to prevent known vulnerabilities.
Tools and Best Practices for Securing Your Development Environment
Utilizing the right tools and adopting best practices can significantly reduce vulnerabilities in your development environment. Implementing these strategies will help you maintain a secure, efficient, and resilient workspace.
- Secure Coding Practices: Use linters with security-focused rules and regularly scan code with tools like SonarQube or GitHub’s Dependabot to identify vulnerabilities early.
- Environment Hardening: Utilize containers (e.g., Docker) to isolate environments and reduce security risks. Secure your tools and servers by disabling unnecessary services and configuring permissions properly.
- Data Protection and Backup: Encrypt sensitive data and use secure storage solutions for credentials, such as environment variables and secret management tools. Regularly back up critical files to safeguard against data loss.
By incorporating these practices, you can create a secure web development environment that minimizes risks and protects your projects from security threats.
##Dev Environment Best Practices
Adopting best practices for your development environment is key to ensuring consistency, reliability, and efficiency across your team. One foundational practice is to standardize your development environment—whether on Linux or Windows—to reduce compatibility issues and make onboarding new developers seamless. Utilizing a package manager like Homebrew or Chocolatey simplifies the installation and management of development tools, ensuring that everyone on the team has access to the same essential components. Maintaining code quality is equally important; implementing consistent coding standards and using tools such as linters and formatters helps catch syntax errors early and keeps your codebase clean and maintainable. By following these best practices, you create an environment that supports productivity, reduces errors, and enables developers to focus on building robust software.
Development Environments and Collaboration
A well-configured development environment is a catalyst for effective collaboration among development teams. By adopting shared or cloud-based development environments, teams can work together in real time, share knowledge, and minimize the risk of configuration drift. Tools like Git and GitHub are indispensable for managing code changes, tracking project progress, and resolving conflicts, making it easier for multiple developers to contribute to the same codebase. Integrating a continuous integration and continuous deployment (CI/CD) pipeline further streamlines collaboration by automating testing, building, and deployment processes. This not only improves developer productivity but also ensures that code changes are thoroughly tested and delivered to end users more reliably. Ultimately, a collaborative development environment empowers teams to innovate faster and deliver higher-quality software.
Enhancing Local Development Environments with Speedscale
Speedscale helps create powerful local development environments by leveraging Kubernetes preview environments that closely mirror production settings. Using tools like Minikube and Skaffold, Speedscale enables developers to deploy applications in isolated environments where real-world traffic conditions can be replicated. This approach allows developers to test code changes and validate application behavior in a controlled setting, identifying issues early and reducing inconsistencies between local and production environments. A key advantage of using Speedscale is its traffic replay feature, which allows recorded production traffic to be replayed within the development environment. This enables thorough testing of application performance and behavior against realistic data, providing immediate feedback and enhancing debugging capabilities. By automating the simulation of service interactions and test scenarios, Speedscale helps streamline the development process, making it easier to catch issues early and ensure reliable performance.
Developer Experience and Satisfaction
Fostering a positive developer experience is crucial for attracting and retaining top talent, as well as driving overall productivity. Providing access to a diverse set of development tools—such as Visual Studio Code, IntelliJ, and GitHub—enables developers to choose the best solutions for their workflow and programming languages. Supporting professional growth through training, mentorship, and opportunities to learn new technologies helps developers stay engaged and motivated. Additionally, cultivating a culture of open communication, regular feedback, and recognition creates an inclusive and supportive development environment where developers feel valued. By prioritizing developer experience and satisfaction, organizations can create an environment that not only boosts productivity but also leads to better software outcomes and long-term business success.
Conclusion
Setting up a development environment is a foundational step in the software development process that directly impacts your productivity and the quality of your work. By implementing the tips and best practices outlined in this guide, you can create a smooth and efficient environment tailored to your needs, making coding, testing, and debugging more manageable. Customize your setup to match your workflow and preferences using tools like an Integrated Development Environment (IDE) to streamline tasks and boost productivity. A well-configured development environment supports your immediate project needs and enhances your overall coding experience, leading to better outcomes and a more enjoyable development journey.