Autoscaling has become increasingly popular with the increased use and further development of cloud technologies, given the new capabilities of platforms like Kubernetes. You want servers to automatically scale up during high loads, so that no users experience downtime. At the same time, you want the servers to automatically scale down when the load drops to save costs.
But, once you’ve set up your autoscaling rules, how do you verify that they’re working as expected? With modern platforms like Azure, AWS, Kubernetes, etc., you should be able to trust that autoscaling works the way it’s been configured. However, as most great testing engineers know: “Trust but verify.”
In this post, you’ll get a high-level description of what autoscaling is, before diving into how Speedscale can help you verify any autoscaling rules you have.
What is Kubernetes Autoscaling?
In any Kubernetes setup, you will have at least one cluster with at least one node. On these nodes, which are essentially just virtual machines, applications will be run inside pods.
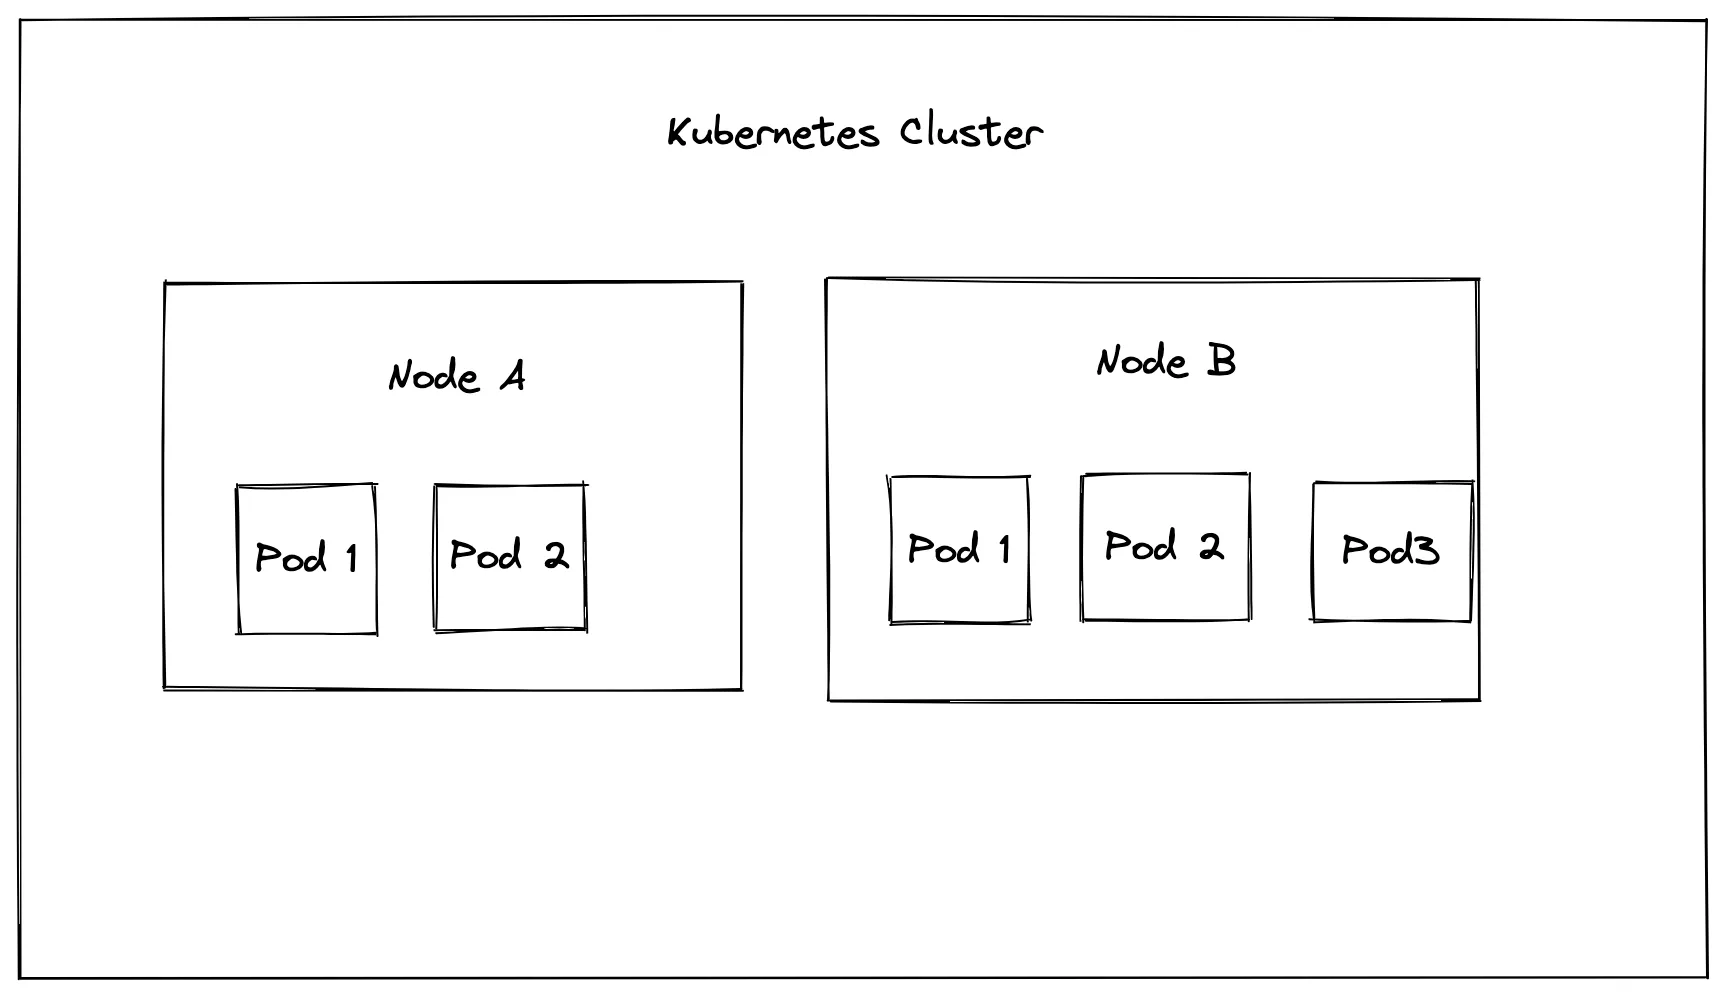
When you’re working with autoscaling, you’re typically referring to either vertical or horizontal scaling. This terminology is used industry-wide and is not specific to Kubernetes. In Kubernetes, vertical scaling refers to increasing the number of resources for any given server or pod, like increasing the RAM of a node from 8 GB to 32 GB. Horizontal scaling refers to increasing the number of nodes or pods in a cluster, thus spreading the load out over multiple servers.
To implement horizontal scaling for nodes in Kubernetes, you need to work with the cluster autoscaler, which increases or decreases the number of nodes when needed.
If you want to scale the number of pods, you need to work with either the horizontal pod autoscaler (HPA) or the vertical pod autoscaler (VPA). For example, a pod can be configured to have a limit of 2 GiB RAM and two virtual CPUs. If these resources are exceeded, new pods will be created on the node. You can set a minimum and a maximum number of replicas that can be created.
After setting up autoscalers on your Kubernetes cluster, it’s important to carry out a load test. This allows you to ensure that traffic is being managed adequately, that requests aren’t getting dropped, and that pods aren’t getting overwhelmed. The metrics from load testing allow you to fine-tune things like resource limits and replica counts to better suit your needs.
Testing Autoscaling with Speedscale
If you’re new to Speedscale, it’s recommended that you first check out this tutorial on how to run a simple load test. Once you’ve finished that, return back to this post, and we can take a look at how to specifically test autoscaling rules.
Preparing your Cluster and Service
To begin this tutorial, you should first create a new namespace, where your service will be deployed:
kubectl create namespace autoscale-test && \
  kubectl config set-context --current --namespace=autoscale-test
Before deploying anything into this namespace, it’s important first to verify that the metrics server is deployed and configured in your cluster. This metrics server is part of how Kubernetes implements autoscaling rules. Check whether it’s installed by running:
kubectl get po -n kube-system | grep metricIf it does not return anything, then the metrics server is not running in your cluster. If you are following this tutorial using Minikube, you can run the following command to activate it:
minikube addons enable metrics-serverFor other clusters, check out the metrics server documentation.
Next, you need to set up a sample service. For this, you’ll need to set up a PHP-Apache server. Save the following contents to a file called deploy.yaml:
apiVersion: apps/v1
kind: Deployment
metadata:
 name: php-apache
 namespace: autoscale-test
spec:
 selector:
   matchLabels:
     run: php-apache
 replicas: 1
 template:
   metadata:
     labels:
       run: php-apache
   spec:
     containers:
     - name: php-apache
       image: k8s.gcr.io/hpa-example
       ports:
       - containerPort: 80
       resources:
         limits:
           cpu: 500m
         requests:
           cpu: 200m
---
apiVersion: v1
kind: Service
metadata:
 name: php-apache
 namespace: autoscale-test
 labels:
   run: php-apache
spec:
 ports:
 - port: 80
 selector:
   run: php-apache
Now deploy the service by executing:
kubectl apply -f deploy.yamlWait a minute or two for the service to be deployed, then verify it by running:
$ kubectl get podsAt this point, you should have everything running for creating autoscaling rules and testing them with Speedscale. This assumes that you’ve followed the load test tutorial and have the Speedscale operator installed.
Configure Autoscaling
In this tutorial, you’ll set up a horizontal pod autoscaler, which will automatically add new pods when the CPU usage of the existing pods goes above 50%. Configure this rule by running:
kubectl autoscale deployment php-apache --cpu-percent=50 --min=1 --max=15Verify that the horizontal pod autoscaler was set up properly by running:
kubectl get hpa
NAME         REFERENCE               TARGETS   MINPODS   MAXPODS   REPLICAS   AGE
php-apache   Deployment/php-apache   1%/50%    1         15        1          10m
NOTE: Seeing
<unknown>/50%under “targets” indicates that your metrics server has not been set up properly. Ensure that the metrics server is configured correctly before continuing. Depending on your previous cluster configuration, any changes to the setup of your metrics server may take some time to correct.
Testing with Pure Kubernetes
At this point, you should have only one replica of your service. To test that the horizontal pod autoscaler is working properly, you need to load test this service and make sure that the replicas increase proportionally with the traffic.
To do this, you will run a BusyBox pod that generates an HTTP call to your service, sleeps for 0.01 seconds, and repeats. Deploy this service by running:
kubectl run -i --tty load-generator --rm --image=busybox --restart=Never -- /bin/sh -c "while sleep 0.01; do wget -q -O- http://php-apache; done"After about 15 minutes, you should see the CPU usage of your pods increasing and in turn, also an increase in the number of replicas you’re running. You can watch this in real time by running:
kubectl get hpa php-apache --watch
NAME         REFERENCE               TARGETS   MINPODS   MAXPODS   REPLICAS   AGE
php-apache   Deployment/php-apache   0%/50%    1         15        1          49m
php-apache   Deployment/php-apache   9%/50%    1         15        1          49m
php-apache   Deployment/php-apache   0%/50%    1         15        1          49m
php-apache   Deployment/php-apache   112%/50%  1         15        1          50m
php-apache   Deployment/php-apache   112%/50%  1         15        1          50m
php-apache   Deployment/php-apache   87%/50%   1         15        1          51m
php-apache   Deployment/php-apache   43%/50%   1         15        1          52m
php-apache   Deployment/php-apache   43%/50%   1         15        1          53m
php-apache   Deployment/php-apache   43%/50%   1         15        1          54m
php-apache   Deployment/php-apache   32%/50%   1         15        1          55m
php-apache   Deployment/php-apache   43%/50%   1         15        1          55m
php-apache   Deployment/php-apache   43%/50%   1         15        1          56m
php-apache   Deployment/php-apache   43%/50%   1         15        1          57m
php-apache   Deployment/php-apache   35%/50%   1         15        1          59m
Note that if you’re not seeing any changes after running the previous command, you might need to add the following annotations to your deployment:
sidecar.speedscale.com/cpu-request: 200m
sidecar.speedscale.com/cpu-limit: 500m
Testing with Speedscale
If you open up the Speedscale dashboard, you’ll see the requests that were generated during the previous section:
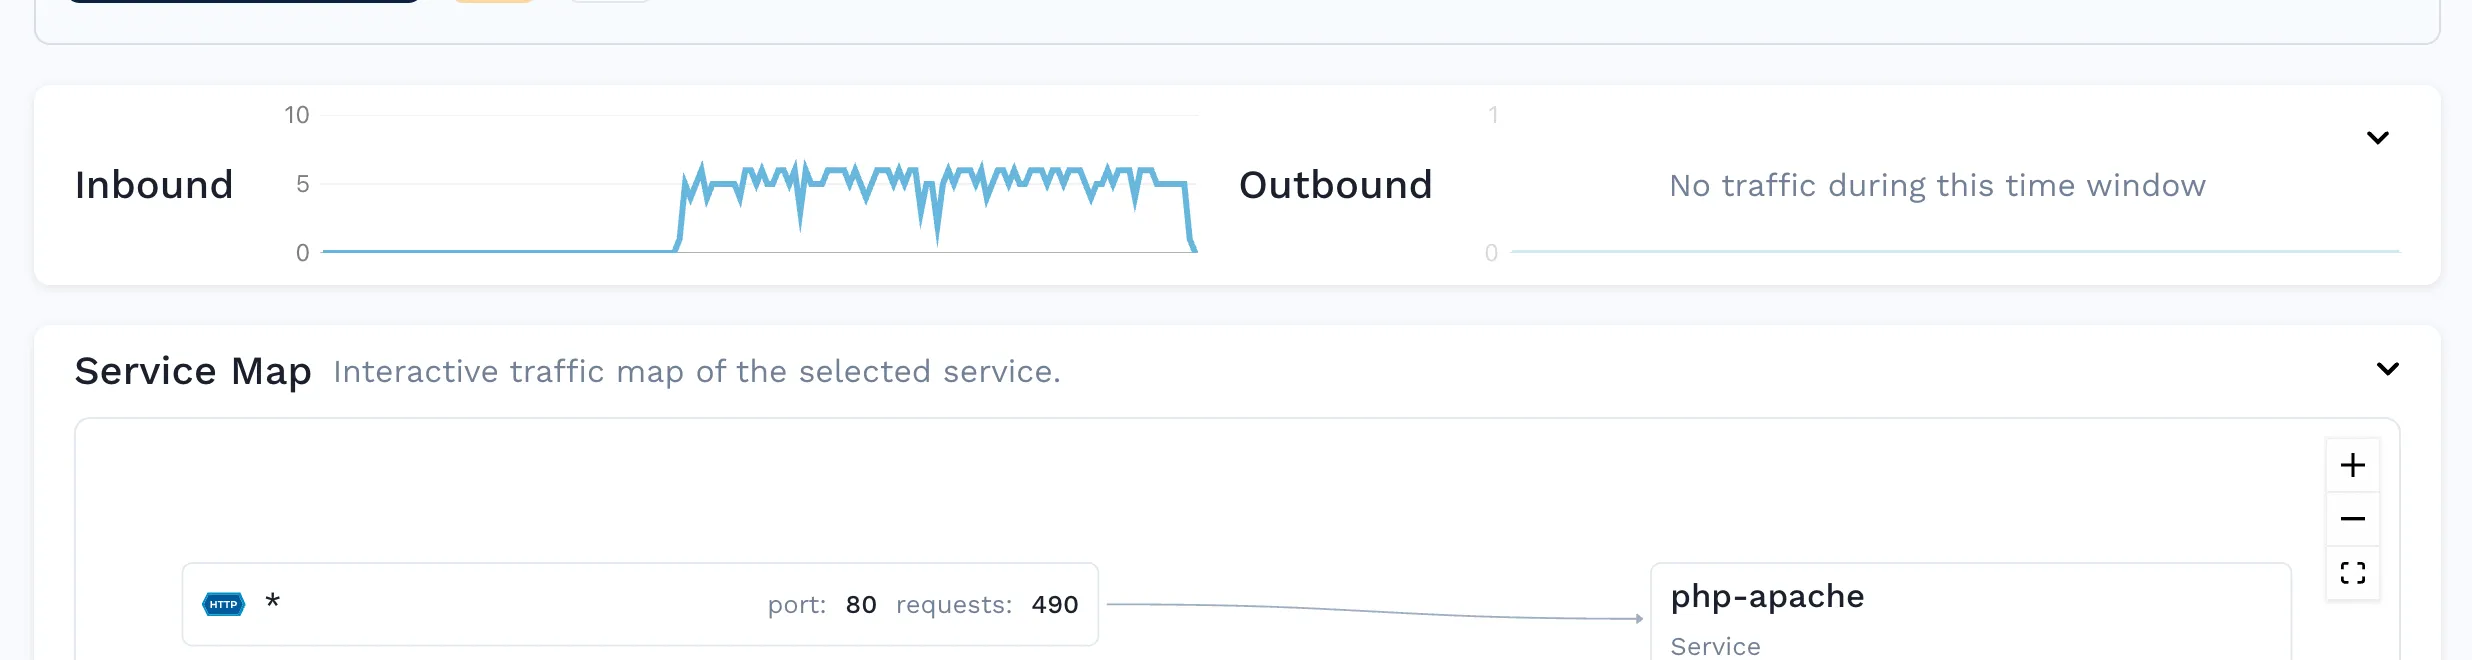
You can also analyze the individual HTTP requests:

By clicking on the “Save” button in the top right corner and accepting all the defaults in the wizard, you can generate a snapshot of this traffic:

With the snapshot created, you can get Speedscale to replay the traffic by adding annotations to the php-apache service. Create a patch file patch.yaml with the following annotations (remember to change the snapshot ID):
apiVersion: apps/v1
kind: Deployment
metadata:
  name: php-apache
  annotations:
    # replace SNAPSHOT_ID with your speedscale snapshot ID
    replay.speedscale.com/snapshot-id: "  <SNAPSHOT_ID>"
    replay.speedscale.com/testconfig-id: "flash_sale"
    replay.speedscale.com/cleanup: "inventory"
    sidecar.speedscale.com/inject: "true"
Note that this test uses the flash_sale test config, which is one of the basic configurations provided by Speedscale out of the box. You can view the details here. The idea behind using a test config like this is that you can vary the load conditions, such as the number of virtual users and time delay between calls.
For instance, the flash_sale configuration tests your deployment with five active virtual users with 0 seconds of delay between requests. You can create your own configuration and provide its testconfig-id here to further customize your test conditions.
Apply the patch to the php-apache deployment:
$ kubectl patch deployment example-payment-app --patch-file patch.yamlOnce this is done, the traffic is going to be replayed on the deployment, which you can confirm by checking the logs of the Speedscale Operator:
$ kubectl logs deployment/speedscale-operator
{"L":"INFO","T":"2022-06-03T14:05:31.903Z","N":"controller.trafficreplay","M":"Starting Controller","reconciler group":"speedscale.com","reconciler kind":"TrafficReplay"}
With this done, you can check the performance metrics on the Speedscale reports:
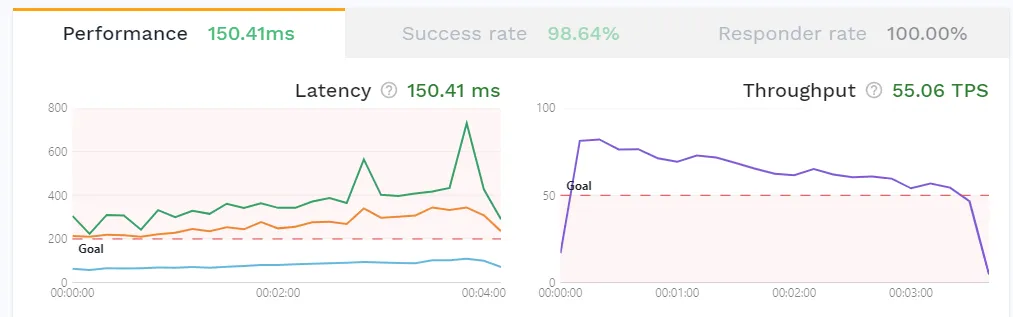
This reports shows the success rate of the requests during the replay, the memory and CPU usage of the pods, as well as the latency of the requests. You can also check that the autoscaler has scaled up with the increasing load the same way as in the previous section:
$ kubectl get hpa php-apache --watch
NAME         REFERENCE               TARGETS   MINPODS   MAXPODS   REPLICAS   AGE
php-apache   Deployment/php-apache   1%/50%    1         15        1          49m
php-apache   Deployment/php-apache   1%/50%    1         15        1          49m
php-apache   Deployment/php-apache   1%/50%    1         15        1          49m
php-apache   Deployment/php-apache   38%/50%   1         15        1          50m
php-apache   Deployment/php-apache   42%/50%   1         15        1          50m
php-apache   Deployment/php-apache   44%/50%   1         15        1          51m
php-apache   Deployment/php-apache   42%/50%   1         15        1          53m
php-apache   Deployment/php-apache   42%/50%   1         15        1          54m
php-apache   Deployment/php-apache   44%/50%   1         15        1          54m
php-apache   Deployment/php-apache   43%/50%   1         15        1          55m
php-apache   Deployment/php-apache   44%/50%   1         15        1          56m
php-apache   Deployment/php-apache   42%/50%   1         15        1          58m
php-apache   Deployment/php-apache   44%/50%   1         15        1          59m
php-apache   Deployment/php-apache   7%/50%    1         15        1          59m
php-apache   Deployment/php-apache   7%/50%    1         15        1          59m
Why Use Speedscale?
In this post, you’ve seen two examples of how to test your autoscaling rules, one using pure Kubernetes and one using Speedscale. At this point, you may be asking why you would prefer the Speedscale approach.
With the pure Kubernetes approach, you had to manually create a new pod that generates traffic to your service, which isn’t necessarily a bad approach. However, you may have noticed that Speedscale didn’t create any new traffic per se, as it reused the traffic recorded from the previous section.
What you may not have considered is that Speedscale is able to use any recorded traffic to run tests, not just traffic within your development cluster. You can record traffic in your production cluster and replay it in your development cluster. For example, you can record traffic during Black Friday and replicate it during your Christmas sale.
In addition, Speedscale will automatically mock any outgoing requests, making sure that you’re testing only the one service you actually care about, rather than inadvertently load-testing third-party APIs. This behavior can, of course, be turned off if you do want to load test your entire infrastructure.