
The Model Context Protocol (MCP) is rapidly becoming the connective tissue for agentic AI systems and IDE tooling. Whether you’re building a dev tool that integrates with LLMs or enabling a context-aware API backend, standing up an MCP server is a rite of passage.
But MCP is still in its early days and there are some sharp edges.
Here are four practical shortcuts to fast-track your MCP server development so you can skip the boilerplate and get to the good stuff: intelligent tooling.
1. Start with stdio before HTTP
MCP supports both stdio and http transports. If you’re just getting started, go with stdio. It avoids all the headaches of routing, TLS, and HTTP headers. MCP’s API definition is fairly straightforward either way but it’s wise to avoid the complexity of an HTTP server when getting started.
Shortcut:
Wrap your server code in a library to make it easy to switch between stdio and HTTP as you gain confidence. Here is an example library for go.
2. Write Verbose Parameter Descriptions
IDEs like Cursor will read the descriptions for each of your parameters and make intelligent guesses to satisfy them. Let’s take an example from the proxymock MCP server written in golang:
	tool := mcp.NewTool("run_mock_server",
		mcp.WithDescription("Runs a mock server that can be used to test the application."),
		mcp.WithString("directory",
			mcp.Required(),
			mcp.Title("Directory containing the mock server configuration (usually proxymock)"),
			mcp.Description("Fully qualified directory path (equivalent to a pwd) on the local filesystem that contains the mock server configuration. Usually the directory ends with 'proxymock' and is contained in the current repository."),
		),
	)
	s.AddTool(tool, handleRunMockServer)
The directory parameter’s description is unnecessarily verbose for a human. However, it causes the LLM to do some work that is pretty valuable. Here’s what happens when we run it:
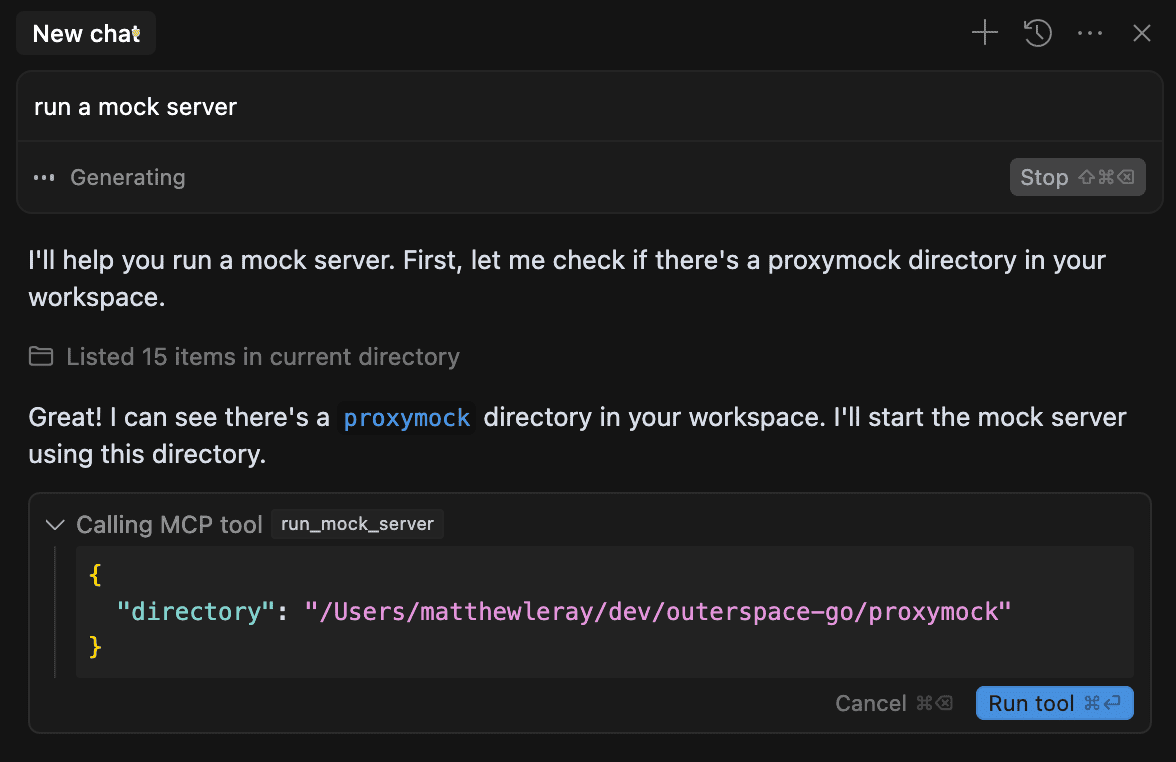
Cursor saw that the MCP server wanted a fully qualified directory called proxymock. Without prompting, it then found such a directory and filled it in correctly.
Shortcut:
Be verbose, borderline pedantic, when writing your command and parameter descriptions. The more explicit you are, the more the LLM will do work for the user without you asking.
3. Don’t write your own test harness—replay real MCP traffic
One of the best ways to harden your server is to replay traffic from MCP clients like Claude or Cursor IDE. Save raw MCP requests and responses as newline-delimited JSON, then run them as tests.
Shortcut:
Use the free proxymock recorder or a simple replay loop to simulate real-world usage. This catches issues with unexpected schema fields, version mismatches, or transport quirks. proxymock provides an MCP server you can install or run it via command line. Assuming the proxymock MCP server is installed, you should:
- Start recording by entering
start traffic recordinginto the chat window. The Cursor or Claude systems will automatically tell the proxymock recorder to store the recording in${cwd}/proxymock. You should receive something like the following response:
proxymock recording started. Please add the following environment variables to your application context:

export http_proxy=socks5h://localhost:4140
export https_proxy=socks5h://localhost:4140
export tcp_proxy=socks5h://localhost:4140

You can view logs at /tmp/proxymock.log and /tmp/proxymock.err.
If you don’t have the MCP server installed you can also perform this same action by running the following command line. Don’t do this if you ran the MCP command above:
proxymock record
- Add environment variables to redirect your outbound API calls to proxymock by asking the following in the chat window:
can you run my app with the environment variables given?
Alternatively, you can manually set your environment variables in your launch.json or other application context.
- Run some calls to your app. You will see them appear in the
proxymockdirectory. - Start a mock server for these API calls by either typing
start mock serverinto your chat window or runningproxymock mockon the command line. The recording stored in the proxymock directory will be used as the template for a mock server.
4. Write Permissive Parsers
LLMs tend to send verbose or unpredictable JSON structures. Claude behaves differently than ChatGPT which is different than Gemini.
Shortcut:
Rather than writing rigid parsing logic, use tools like jq, sjson, or even jsonpath for lightweight transformations and validation. It’s better to “hunt and peck” for a field vs trying to enforce a rigid structure.
Summary
This post shares four practical shortcuts to accelerate your MCP (Model Context Protocol) server development. From starting with stdio for simplicity, to writing ultra-descriptive parameter definitions, replaying real traffic with tools like proxymock, and using flexible JSON parsers—these tips help developers skip the boilerplate and focus on building intelligent, context-aware tools faster and with fewer headaches.